It was a crisp autumn afternoon, the kind where the wind whistles through the maple leaves and the kitchen smells like buttered toast and fresh herbs. I was pulling a tray of golden‑brown biscuits from the oven when my niece, eyes wide with curiosity, asked if there was anything “fluffy and cheesy” she could snack on while we waited for the soup to simmer. The answer, as it turned out, was right there in the pantry: a sack of russet potatoes, a block of sharp cheddar, and a handful of pantry staples that I hadn’t thought of in years. The moment I lifted the lid of the pot, a cloud of fragrant steam hit me – buttery, earthy, and tinged with the faintest note of caramelized onion that made my mouth water before I even tasted a bite.
I remember the first time I tried to turn those humble mashed potatoes into something airy and bite‑size. The kitchen filled with the sound of the mixer whirring, the occasional pop of butter melting in a pan, and the soft thump of a wooden spoon against the bowl. When the mixture finally came together, it felt like a secret waiting to be revealed – a velvety cloud that could hold its own against any appetizer spread. The first puff I dropped into the hot oil puffed up like a tiny balloon, its surface turning a perfect, inviting shade of amber, and the cheese inside stretched in slow, buttery ribbons. That moment was pure culinary magic, and I’ve been perfecting it ever since.
What makes this recipe stand out is the balance between comfort and sophistication. On one hand, you have the familiar, comforting taste of creamy mashed potatoes that remind you of grandma’s Sunday dinner. On the other, the crisp exterior and molten cheese center give it a restaurant‑quality elegance that makes guests feel like they’re indulging in something special. It’s the kind of dish that can turn an ordinary gathering into a celebration, and the best part? It’s surprisingly simple to pull off, even for a home cook who isn’t a professional chef. But wait – there’s a secret technique in step four that takes the texture from good to unforgettable, and I’ll reveal it shortly.
So, are you ready to dive into a recipe that will have your family reaching for seconds, your friends asking for the recipe, and your taste buds doing a happy dance? Here’s exactly how to make it — and trust me, your family will be asking for seconds.
🌟 Why This Recipe Works
- Flavor Depth: The combination of buttery mashed potatoes and sharp cheddar creates a layered flavor profile that feels both familiar and exciting, delivering a savory richness that lingers on the palate.
- Texture Contrast: A crisp, golden exterior gives way to a soft, airy interior, while the melted cheese adds a luscious, stretchy surprise in every bite.
- Ease of Execution: Most of the work happens while the potatoes are boiling, leaving you free to prep other dishes or simply relax and enjoy the aromas filling your kitchen.
- Time Efficiency: From start to finish, the recipe takes less than an hour, making it perfect for weeknight gatherings or last‑minute party appetizers.
- Versatility: These puffs can be served as a starter, a side, or even a playful snack for kids, and they pair beautifully with a range of dips, from tangy sour cream to spicy sriracha mayo.
- Nutrition Boost: Using real potatoes and cheese provides a good source of potassium, calcium, and protein, while the light frying method keeps the dish from becoming overly heavy.
- Ingredient Quality: Fresh, high‑quality potatoes and a good melting cheese make all the difference, turning simple pantry items into a gourmet experience.
- Crowd‑Pleasing Factor: The visual appeal of a puffed, golden bite, combined with the irresistible aroma of melted cheese, makes it a guaranteed hit at any gathering.
🥗 Ingredients Breakdown
The Foundation – Potatoes & Butter
Russet potatoes are the star of the show because their high starch content creates a naturally creamy texture when mashed. Peel them first to avoid any unwanted skins that could affect the smoothness of the base. Boil the potatoes in salted water until they’re fork‑tender, then drain and mash while still steaming hot – this helps release the natural starches, giving you a silkier mash. Adding a generous knob of unsalted butter not only enriches the flavor but also adds a glossy sheen that signals a professional finish. If you’re looking for a dairy‑free version, try using a high‑quality plant‑based butter; the flavor will stay buttery, and the texture remains luxurious.
Aromatics & Spices – Onion, Garlic, and Herbs
Finely diced onions and minced garlic are sautéed until they turn translucent and fragrant, releasing sweet, caramelized notes that deepen the overall flavor. I like to add a pinch of fresh thyme or rosemary; these herbs bring a subtle earthiness that balances the richness of the cheese. Don’t forget a dash of freshly ground black pepper – it adds a gentle heat that cuts through the buttery base. For a hint of warmth, a pinch of smoked paprika works wonders, giving the puffs a faint smoky whisper without overpowering the main flavors.
The Secret Weapons – Cheese & Flour
Sharp cheddar is my go‑to cheese because it melts beautifully while retaining a robust flavor that stands out against the mild potatoes. Grate it finely so it integrates smoothly into the mash, creating pockets of molten goodness that burst when you bite into a puff. As for the flour, using all‑purpose flour helps bind the mixture and provides structure, ensuring the puffs hold their shape during frying. If you’re craving a lighter bite, substitute half of the flour with cornstarch; this creates a crisper crust without sacrificing interior fluffiness.
Finishing Touches – Eggs, Baking Powder, and Seasonings
Eggs act as a natural leavener and binder, giving the dough elasticity and helping it rise during cooking. Beat the eggs lightly before folding them in, ensuring they’re evenly distributed without over‑mixing, which could toughen the texture. A pinch of baking powder, as mentioned earlier, introduces tiny air bubbles that expand when heated, resulting in that coveted puffed look. Finally, taste the mixture and adjust salt, pepper, or a splash of milk for extra creaminess. Remember, the seasoning should be balanced – you want each bite to sing, not shout.
With your ingredients prepped and ready, let's get cooking. Here's where the fun really begins...
🍳 Step-by-Step Instructions
Start by bringing a large pot of salted water to a rolling boil. Add the peeled russet potatoes and let them cook for about 15‑20 minutes, or until a fork slides in easily without resistance. Once tender, drain the potatoes and return them to the pot; the residual heat will help evaporate excess moisture, which is crucial for a light, airy puff. Mash the potatoes with a potato masher or ricer until they’re completely smooth, then stir in the butter while the mash is still hot, allowing it to melt fully and coat every starch grain.
While the potatoes are still warm, whisk in the milk (or a dairy‑free alternative) a tablespoon at a time until you reach a creamy consistency. This step is where the magic of a silky mash begins; the milk should be just enough to loosen the potatoes without making them soupy. Next, fold in the grated sharp cheddar, letting the residual heat melt the cheese into a luscious, glossy ribbon that weaves through the mash. The aroma at this point is intoxicating – a buttery, cheesy perfume that fills the kitchen and makes you want to taste it immediately.
In a separate skillet, sauté the finely diced onions and minced garlic in a splash of butter over medium heat until they turn translucent and fragrant, about 3‑4 minutes. This gentle cooking draws out natural sugars, adding a subtle sweetness that balances the savory cheese. Once softened, stir the aromatics into the mashed potato mixture, ensuring they’re evenly distributed. At this stage, sprinkle in the fresh thyme or rosemary, a pinch of smoked paprika, and season generously with salt and pepper. The mixture should now have a deep, complex aroma that hints at the final flavor.
Now it’s time to incorporate the dry ingredients. Sift the all‑purpose flour and baking powder together to avoid lumps, then fold them gently into the mash. The batter will be thick but pliable; if it feels too stiff, add a splash of milk, one tablespoon at a time, until it reaches a consistency that can be scooped with a spoon but still holds its shape. Finally, beat the eggs lightly and fold them in, being careful not to over‑mix – you want to keep the air bubbles intact for that puffed texture later.
Heat a deep, heavy‑bottomed pan with enough oil (vegetable or canola works best) to submerge the puffs about 2‑3 inches deep. Aim for a temperature of 350°F (175°C); you can test this by dropping a small spoonful of batter – if it sizzles and rises to the surface within seconds, the oil is ready. Using a slotted spoon, carefully drop rounded tablespoons of the mixture into the hot oil, giving each puff enough space to expand without crowding. The oil should bubble gently around each puff, creating a crackling sound that signals a perfect fry.
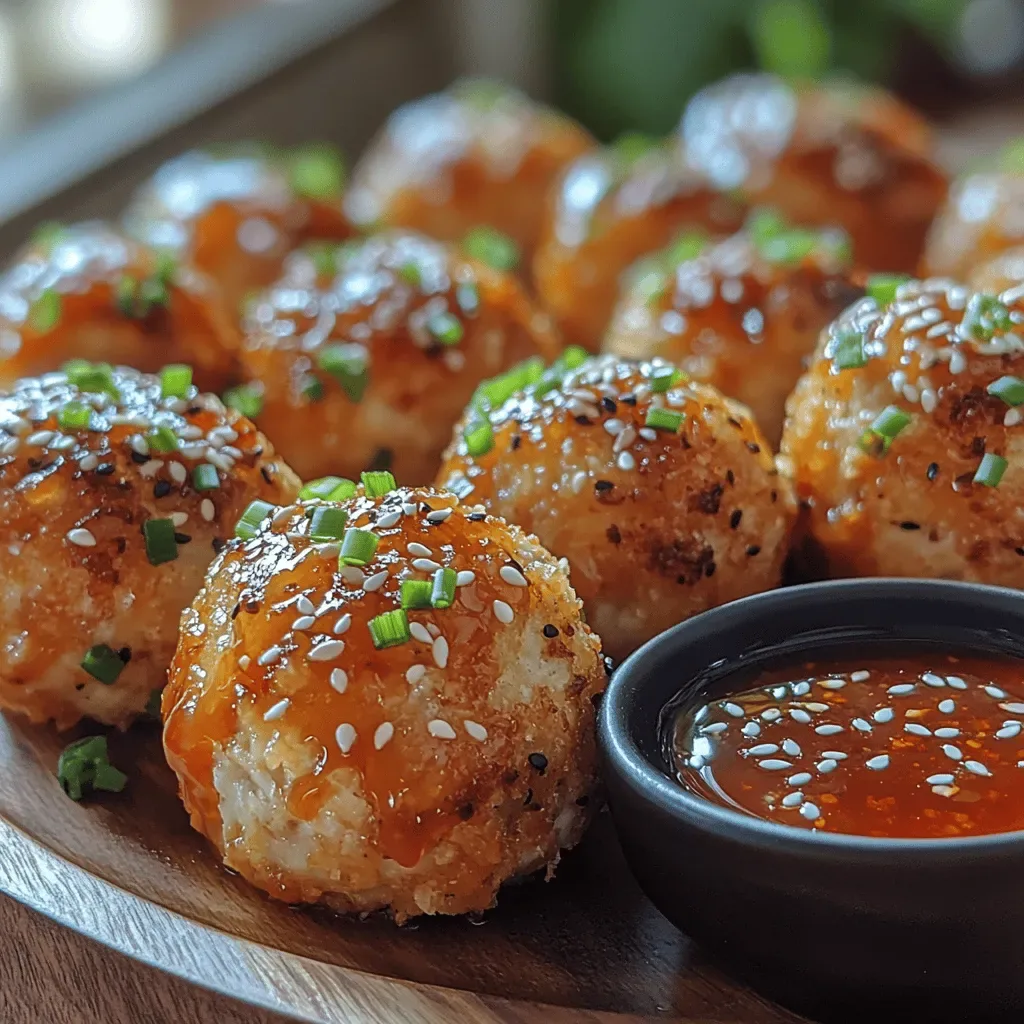
Fry the puffs for 3‑4 minutes, turning them once halfway through to ensure an even golden‑brown crust on all sides. You’ll know they’re done when the exterior is crisp, the cheese inside is bubbling, and the puffs have puffed up like tiny clouds. Use a slotted spoon to transfer them onto a paper‑towel‑lined plate, allowing excess oil to drain away. While they’re still hot, sprinkle a light dusting of sea salt or even a pinch of grated Parmesan for an extra flavor boost.
Serve the mashed potato cheese puffs immediately while they’re still warm and the cheese is wonderfully stretchy. Pair them with a cooling dip like herbed sour cream, a tangy tomato salsa, or even a sweet chili sauce for contrast. The best part? They stay delightfully crisp for about 15 minutes, giving you enough time to plate them beautifully and watch your guests’ eyes light up. Trust me on this one: a warm, cheesy puff in hand is pure comfort food elevated to a party‑ready level.
And there you have it! But before you dig in, let me share some tips that will take this from great to absolutely unforgettable...
🔐 Expert Tips for Perfect Results
The Taste Test Trick
Before you shape the entire batch, fry a single test puff. This tiny experiment lets you gauge the oil temperature, seasoning balance, and texture. If the test puff is too pale, raise the heat a few degrees; if it’s too dark, lower it slightly. I once served a batch that was a shade too dark, and the smoky flavor overwhelmed the delicate cheese – a quick taste test would have saved that disaster.
Why Resting Time Matters More Than You Think
Allow the mashed potato mixture to rest for 10‑15 minutes after mixing in the eggs and flour. This short pause lets the gluten relax and the baking powder activate, resulting in a lighter puff. I used to skip this step in a rush, only to end up with dense, doughy bites that never rose properly. Trust me, patience here pays off big time.
The Seasoning Secret Pros Won’t Tell You
A pinch of nutmeg in the mash adds a warm, almost nutty undertone that pairs beautifully with cheddar. It’s a subtle flavor that most home cooks overlook, but professional chefs often use it to deepen the savory profile. Add it sparingly – a little goes a long way, and you’ll notice the difference instantly.
Oil Choice and Temperature Control
Using a high smoke‑point oil like grapeseed or avocado oil ensures the puffs fry evenly without imparting a burnt flavor. Keep a kitchen thermometer handy; fluctuating temperatures cause uneven browning and can make some puffs soggy while others turn crispy. I once tried to multitask and forgot to monitor the heat, ending up with a half‑cooked batch that was a disappointment.
The Crunch Factor – Light Dusting
A final dusting of fine cornmeal or panko right after frying adds an extra crunch that makes each bite sing. The tiny grains create a contrast against the soft interior, turning a simple puff into a textural masterpiece. I love to add a dash of smoked paprika to the dusting for a subtle smoky kick that complements the cheese beautifully.
🌈 Delicious Variations to Try
One of my favorite things about this recipe is how versatile it is. Here are some twists I've tried and loved:
Spicy Jalapeño Burst
Finely dice fresh jalapeños and fold them into the mash for a subtle heat that awakens the palate. The peppery bite pairs perfectly with the creamy cheese, creating a flavor dance that’s both comforting and exciting. Serve with a cooling avocado dip to balance the spice.
Herb‑Infused Green Delight
Add a handful of chopped fresh spinach and a blend of herbs like basil, parsley, and chives to the mixture. The green hue not only makes the puffs visually stunning but also introduces an earthy freshness that brightens the overall taste. Pair with a lemon‑yogurt sauce for a bright finish.
Smoky Bacon & Cheddar
Crisp up bacon pieces and crumble them into the mash, then increase the cheddar ratio for an ultra‑savory, smoky profile. The salty crunch of bacon juxtaposed with the melt‑in‑your‑mouth cheese creates a crowd‑pleasing indulgence that’s perfect for brunch or game night.
Sweet & Savory Apple Cheddar
Grate a small apple (preferably a tart variety like Granny Smith) into the mash and add a touch of cinnamon. The subtle sweetness and aromatic spice complement the sharp cheddar, delivering a surprising yet harmonious flavor. These puffs shine when served alongside a honey‑mustard dip.
Vegan Coconut & Nutritional Yeast
Swap the dairy butter for coconut oil, use plant‑based milk, and replace cheddar with nutritional yeast mixed with a bit of vegan cheese shreds. The result is a dairy‑free puff that still boasts a rich, cheesy flavor and a tender crumb. Serve with a cashew‑based sour cream for a fully vegan experience.
Garlic‑Parmesan Explosion
Increase the garlic to two cloves, and finish the puffs with a generous sprinkle of grated Parmesan just after frying. The extra garlic adds depth, while the Parmesan brings a sharp, salty finish that elevates the overall taste. Pair with a simple marinara for an Italian twist.
📦 Storage & Reheating Tips
Refrigerator Storage
Place cooled puffs in an airtight container lined with a paper towel to absorb excess moisture. They’ll stay fresh for up to 3 days, retaining most of their crispness. When you’re ready to eat, reheat them in a preheated oven at 375°F (190°C) for 8‑10 minutes, which revives the golden crust without making them soggy.
Freezing Instructions
For longer storage, arrange the fully cooled puffs on a baking sheet in a single layer and freeze until solid. Transfer them to a zip‑top freezer bag, label with the date, and store for up to 2 months. To cook from frozen, add an extra minute or two to the frying time, or bake at 400°F (200°C) for 12‑15 minutes, turning halfway through.
Reheating Methods
The trick to reheating without drying out? A splash of broth or a drizzle of melted butter tossed with the puffs before a quick oven blast. This adds moisture back into the interior while preserving the crispy exterior. If you’re in a hurry, a toaster oven works wonders – just keep an eye on them to prevent over‑browning.