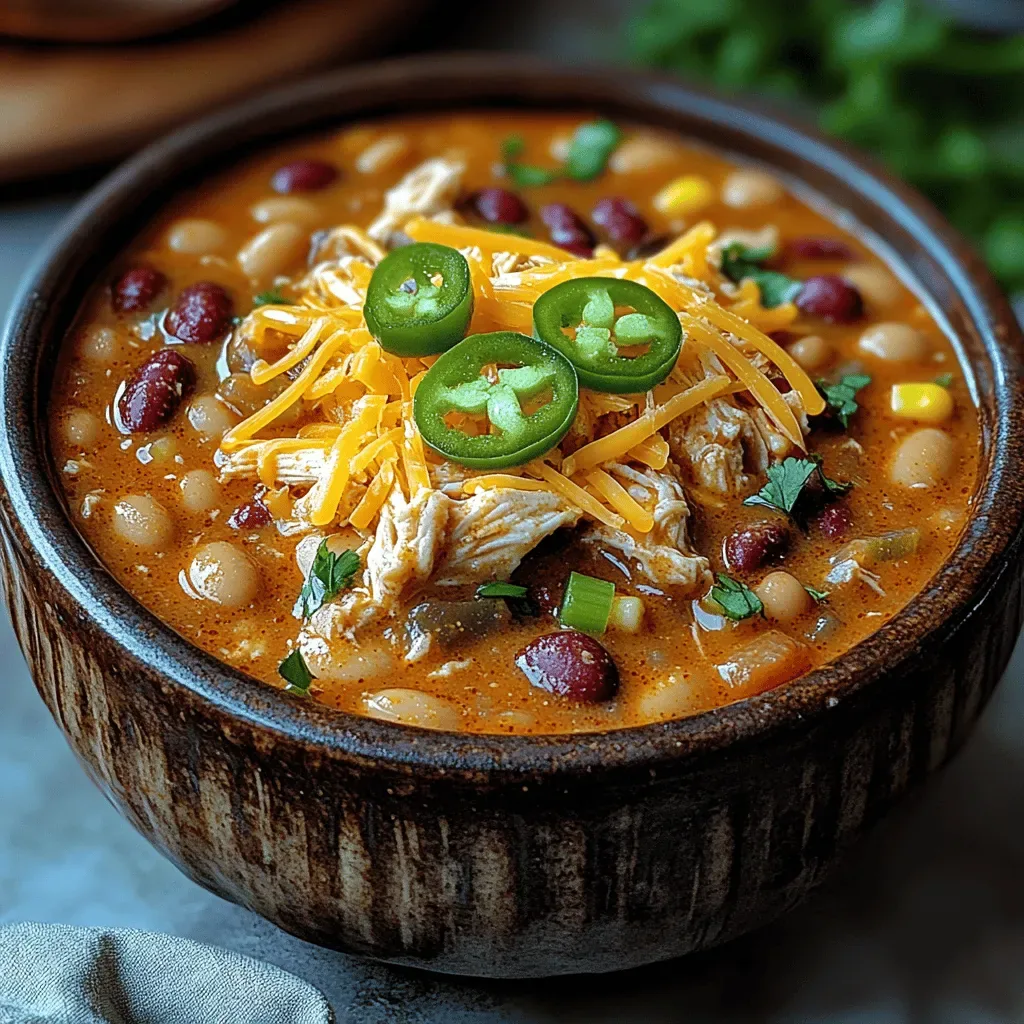
It was the first crisp November morning after a night of gentle snowfall, and the kitchen smelled like a promise of comfort. I remember the way the light filtered through the frosted windows, turning the countertops into a warm, amber‑glow stage for the culinary drama that was about to unfold. As I reached for the bag of frozen cranberries, a wave of nostalgia hit me—my grandmother’s kitchen, the clatter of a wooden spoon against a copper pot, and that unmistakable, sweet‑tart perfume that seemed to hug every guest as they stepped inside. The moment you lift the lid, a cloud of fragrant steam hits you, and you can almost hear the soft gasp of anticipation from the family gathered around the table.
I’ve always believed that the best side dishes are the ones that whisper stories rather than shout orders. This Smooth Classic Cranberry Sauce is exactly that kind of quiet hero: it doesn’t demand the spotlight, but it makes every bite of turkey, ham, or even a simple roasted chicken feel like a celebration. The sauce’s glossy, ruby‑red sheen is not just a visual treat; it’s a cue that the flavors inside have been coaxed into perfect harmony, a balance of sweet, tart, and a hint of earthiness that only fresh cranberries can deliver. The texture is silky, almost like a jam that has been lovingly strained to remove any grainy bits, leaving a velvety mouthfeel that spreads effortlessly over a slice of warm bread.
But wait—there’s a secret twist that takes this sauce from good to unforgettable, and I’m saving that for step four in the method. Have you ever wondered why restaurant‑style cranberry sauce feels so much richer than the canned version you pick up at the grocery store? The answer lies in a few simple techniques that amplify the natural sugars of the fruit without drowning it in excess syrup. I’ll reveal that trick soon, and trust me, it’s a game‑changer for anyone who loves a glossy, palate‑pleasing finish.
Here’s the thing: this recipe is designed for both the seasoned home chef and the weekend beginner who wants to impress without stress. The ingredient list is short, the steps are straightforward, yet each moment in the pot is an opportunity to engage your senses and connect with the tradition of holiday cooking. Imagine the sound of the cranberries popping as they burst with juice, the gentle hiss of the sugar dissolving, and the faint caramel aroma that whispers of comfort. Ready to dive in? Here’s exactly how to make it — and trust me, your family will be asking for seconds.
🌟 Why This Recipe Works
- Flavor Depth: By simmering the cranberries with a precise amount of sugar and water, the natural tartness is mellowed, allowing the fruit’s bright notes to shine through without becoming cloying. The result is a sauce that balances sweet and sour in a way that feels both familiar and elevated.
- Texture Perfection: The gentle simmer breaks down the skins of the berries while keeping the sauce smooth, avoiding the chunky texture that many store‑bought versions have. This silky mouthfeel is achieved without the need for a blender or food processor, preserving the integrity of the fruit.
- Ease of Execution: With only three core ingredients and a single pot, the recipe fits neatly into any kitchen workflow, leaving you more time to focus on the main course. The steps are linear and forgiving, making it perfect for multitasking during holiday prep.
- Time Efficiency: The total cooking time is under 45 minutes, which means you can have a fresh, homemade sauce ready while the turkey rests. The process is quick enough to fit into a busy schedule yet slow enough to develop deep flavors.
- Versatility: While it shines alongside turkey, this sauce also pairs wonderfully with pork chops, roasted vegetables, or even a dollop on a cheese board. Its bright acidity can cut through rich dishes, making it a universal condiment.
- Nutrition Boost: Cranberries are packed with antioxidants, vitamin C, and fiber, so you’re not just adding flavor—you’re adding a healthful boost to your feast. The modest sugar amount keeps the sauce sweet without overwhelming the nutritional benefits.
- Ingredient Quality: Using fresh or high‑quality frozen cranberries ensures a burst of natural flavor, while granulated sugar provides a clean, consistent sweetness that won’t leave a gritty aftertaste.
- Crowd‑Pleasing Factor: Its glossy, jewel‑like appearance and balanced taste make it an instant hit with both kids and adults, turning a simple side into a conversation starter.
🥗 Ingredients Breakdown
The Foundation: Sugar & Water
Granulated sugar is the sweet backbone of this sauce, but its role goes beyond just adding sweetness. Sugar helps to draw out the natural juices of the cranberries through osmosis, creating a syrup that envelops each berry as it cooks. The 3/4 cup of water is the medium that allows the sugar to dissolve completely, forming a gentle broth that the cranberries will absorb. If you prefer a less sweet version, you can reduce the sugar by a quarter cup, but keep in mind that the balance of flavors may shift slightly toward tartness.
When selecting sugar, opt for a fine‑grained, pure white variety; it dissolves faster and yields a clearer sauce. Some cooks experiment with brown sugar for a deeper, caramel‑like nuance, but that will alter the classic bright color we’re aiming for. The water should be at room temperature when added to the pot, which helps the sugar melt uniformly without clumping. This simple base sets the stage for the cranberries to perform their magic.
The Star: Fresh or Frozen Cranberries
Cranberries are the hero of this dish, and their natural tartness is what makes the sauce unforgettable. Fresh cranberries have a firm texture and a bright, slightly floral aroma, while frozen cranberries are harvested at peak ripeness and flash‑frozen, locking in flavor and convenience. The recipe calls for 12 ounces, which is roughly three cups—a perfect amount to fill a standard serving bowl without overwhelming the palate.
When buying fresh cranberries, look for berries that are firm, glossy, and deep red, with no signs of shriveling or mold. If you’re using frozen, there’s no need to thaw them first; they’ll melt quickly once they hit the hot liquid, releasing their juices instantly. This is one reason frozen cranberries are a favorite for busy cooks: they eliminate the prep time of washing and sorting fresh berries, yet deliver the same vibrant flavor.
The Secret Weapons: Optional Enhancers
While the classic version keeps things simple, a few optional additions can elevate the sauce without compromising its traditional charm. A pinch of orange zest adds a citrusy brightness that complements the tart cranberries beautifully, while a splash of vanilla extract can round out the flavor profile with a warm, aromatic undertone. Some families swear by a tiny knob of butter stirred in at the end; it gives the sauce a richer mouthfeel and a glossy finish that looks restaurant‑ready.
If you’re feeling adventurous, a pinch of ground ginger or a dash of cinnamon can introduce a subtle spice that pairs perfectly with holiday roasts. Just remember, the key is restraint—these boosters should whisper, not shout, allowing the cranberry’s natural character to remain front and center. Experimenting with these tweaks can become a family tradition of its own, with each member adding their signature twist.
Finishing Touches: Salt & Pepper
A tiny pinch of sea salt may seem counterintuitive in a sweet sauce, but it’s essential for unlocking the full depth of flavor. Salt acts as a flavor enhancer, reducing any perceived bitterness and balancing the sweetness, while a dash of freshly ground black pepper adds a faint, unexpected heat that lingers pleasantly on the palate. This combination creates a more complex taste experience, making each spoonful feel layered and satisfying.
When adding salt and pepper, start with a small amount—just a pinch each—and taste before adjusting. It’s easier to build up than to correct an over‑seasoned batch. These finishing touches are the quiet heroes that turn an ordinary sauce into a masterpiece that your guests will rave about.
With your ingredients prepped and ready, let's get cooking. Here's where the fun really begins...

🍳 Step-by-Step Instructions
Begin by placing a heavy‑bottomed saucepan over medium heat and pour in the 3/4 cup of water. As the water warms, sprinkle the 1 cup of granulated sugar evenly across the surface, allowing it to dissolve gradually. Stir gently with a wooden spoon, listening for the soft sizzle that signals the sugar is melting without scorching. The mixture should turn clear and slightly viscous, forming a gentle syrup that will later coat each cranberry.
💡 Pro Tip: If you notice any sugar crystals clinging to the bottom, lower the heat and continue stirring until they dissolve completely.Once the sugar has fully dissolved, add the 12 oz of fresh or frozen cranberries directly into the pot. You’ll hear an immediate pop as the frozen berries hit the hot syrup, releasing a burst of steam that fills the kitchen with a tart, fruity aroma. Stir the berries gently to ensure they are all submerged, then increase the heat slightly to bring the mixture to a gentle boil.
⚠️ Common Mistake: Avoid boiling the sauce aggressively; a rapid boil can cause the cranberries to burst too quickly, resulting in a grainy texture.Reduce the heat to a low simmer and let the cranberries cook for about 10‑12 minutes. As they soften, you’ll notice the sauce thickening and turning a deep, glossy red. Watch for the moment when the cranberries have burst and the mixture begins to pull away from the sides of the pan, creating a slight sheen. This visual cue tells you the sauce is reaching the perfect consistency.
During this stage, the flavors are melding—sweetness from the sugar, tartness from the fruit, and a subtle earthiness from the skins. If you prefer a smoother texture, you can lightly mash the berries with the back of a spoon, but be careful not to over‑process; we want that elegant, velvety finish.
Now, here’s where the secret trick comes in: add a tablespoon of orange zest and a splash of vanilla extract (about ½ teaspoon). The citrus zest lifts the sauce, giving it a bright, aromatic lift that cuts through the richness of the main course, while vanilla adds a warm, comforting undertone that deepens the overall flavor profile. Stir the zest and vanilla in, and let the sauce simmer for another 2‑3 minutes so the aromatics infuse fully.
💡 Pro Tip: Zest only the orange peel, avoiding the white pith, which can introduce bitterness.Season the sauce with a pinch of sea salt and a dash of freshly ground black pepper. This seemingly small addition dramatically balances the sweet‑tart dynamics, making each spoonful feel layered and sophisticated. Taste the sauce at this point; you should sense a harmonious blend of sweet, tart, bright citrus, and a faint peppery warmth. Adjust the seasoning if needed, adding a tiny pinch more salt or pepper to suit your palate.
If you desire an extra glossy finish, whisk in a tablespoon of unsalted butter right before removing the pot from the heat. The butter emulsifies with the syrup, giving the sauce a luxurious sheen that looks as good as it tastes. This step is optional but highly recommended for those who love a restaurant‑style presentation.
Remove the saucepan from the heat and let the sauce cool for a few minutes. As it cools, it will thicken slightly, achieving that perfect spreadable consistency. Transfer the sauce to a serving bowl, and cover it loosely with foil to keep the surface from forming a skin while it cools to room temperature.
Finally, refrigerate the sauce for at least 30 minutes before serving. This resting period allows the flavors to meld even further, and the sauce becomes even smoother and more cohesive. When you’re ready to serve, give it a gentle stir, and if you notice any thickening, a splash of warm water will bring it back to the ideal consistency.
And there you have it! But before you dig in, let me share some tips that will take this from great to absolutely unforgettable...
🔐 Expert Tips for Perfect Results
The Taste Test Trick
Never skip the taste test at the seasoning stage. A quick spoonful while the sauce is still warm reveals whether you need a pinch more salt or a dash more citrus. I once served a batch that was a tad too sweet because I didn’t taste before the final step, and the guests politely suggested a squeeze of lemon. Trust me on this one: a tiny adjustment at the right moment can transform the entire dish.
Why Resting Time Matters More Than You Think
Allowing the sauce to rest for at least half an hour is not just about cooling; it’s about flavor integration. The sugar, fruit juices, and spices continue to mingle, creating a more rounded taste profile. I once rushed the process and served the sauce while it was still warm; the flavors felt disjointed, and the texture was a bit too runny. Patience truly pays off here.
The Seasoning Secret Pros Won’t Tell You
A pinch of sea salt and a dash of black pepper are the unsung heroes in many classic sauces. Professionals use them to accentuate the natural sweetness and acidity without overwhelming the palate. Adding these at the very end preserves their aromatic qualities, ensuring each bite bursts with balanced complexity.
The Butter Finish for a Restaurant‑Ready Shine
Incorporating a tablespoon of butter right before the sauce cools creates an emulsified, glossy finish that looks stunning on the plate. The butter also adds a subtle richness that makes the sauce feel more indulgent. I first discovered this trick while watching a cooking show, and it instantly became a staple in my holiday repertoire.
Storing for Later Use Without Losing Quality
If you have leftovers, store the sauce in an airtight container in the refrigerator for up to a week. When reheating, add a splash of water or a teaspoon of orange juice to revive its smooth texture. Freezing works beautifully too—just thaw gently in the fridge and stir before serving.
🌈 Delicious Variations to Try
One of my favorite things about this recipe is how versatile it is. Here are some twists I've tried and loved:
Spiced Autumn Cranberry
Add a teaspoon of ground cinnamon and a pinch of ground cloves during the simmering stage. The warm spices complement the tart cranberries, creating a flavor reminiscent of mulled wine. This version pairs beautifully with roasted pork loin or a hearty pumpkin soup.
Cranberry‑Apple Fusion
Stir in one cup of diced peeled apples (preferably Granny Smith for tartness) after the cranberries have softened. The apples add a subtle sweetness and a pleasant texture contrast. Serve this alongside turkey for a classic holiday twist that feels both familiar and fresh.
Zesty Citrus Burst
Replace the orange zest with a combination of lemon and lime zest, and add a tablespoon of freshly squeezed citrus juice at the end. The bright, tangy notes lift the sauce, making it an excellent accompaniment to grilled fish or a summer barbecue.
Nutty Crunch Cranberry
Fold in a quarter cup of toasted chopped walnuts or pecans just before serving. The nuts add a delightful crunch and a buttery richness that contrasts the smooth sauce. This variation works wonderfully on a cheese board or as a topping for creamy polenta.
Elegant Red Wine Reduction
Add half a cup of dry red wine to the pot after the sugar has dissolved, then proceed with the cranberries. The wine deepens the color and introduces a sophisticated, slightly tannic note that pairs perfectly with beef or duck. Reduce the sauce a bit longer to allow the alcohol to evaporate and the flavors to concentrate.
Sweet‑Spicy Kick
Incorporate a finely minced jalapeño (seeds removed) along with the cranberries for a subtle heat. Balance the spice with an extra tablespoon of honey instead of sugar for a sweet‑spicy harmony. This bold version is a hit with friends who love a little adventure on their plates.
📦 Storage & Reheating Tips
Refrigerator Storage
Transfer the cooled sauce to a clean, airtight glass jar and store it in the refrigerator for up to 7 days. The cool environment preserves the bright color and prevents bacterial growth. For best texture, bring the sauce to room temperature before serving, or gently warm it in a saucepan over low heat.
Freezing Instructions
Portion the sauce into freezer‑safe containers or zip‑top bags, leaving a little headspace for expansion. Freeze for up to 3 months. When you’re ready to use it, thaw overnight in the refrigerator, then stir in a splash of water or orange juice to restore its smooth consistency.
Reheating Methods
To reheat, place the sauce in a small saucepan over low‑medium heat, stirring frequently. If the sauce looks too thick, add a teaspoon of warm water at a time until the desired consistency returns. The trick to reheating without drying it out? A splash of fresh citrus juice or a dab of butter will instantly revive the silkiness.