It was a crisp autumn evening when I first fell in love with the idea of a perfectly crisp duck breast paired with a bright, tangy cherry sauce. The kitchen was filled with the soft glow of candlelight, and the scent of fresh thyme and garlic drifted from the pan, mingling with the faint sweetness of cherries that reminded me of my grandmother’s holiday table. I remember the moment I lifted the lid of the skillet, and a cloud of fragrant steam rose like a warm hug, carrying notes of caramelized fat, herbaceous earth, and a whisper of balsamic acidity. That first bite—crackling skin, succulent meat, and a sauce that sang with both sweet and savory chords—was a revelation, and I’ve been chasing that perfect balance ever since.
What makes this dish stand out is its simplicity on the surface but depth of flavor underneath. The duck breast, when rendered correctly, yields a golden‑brown, crackly skin that is impossible to resist, while the meat stays tender and juicy, almost buttery in texture. The cherry sauce, on the other hand, is an easy‑to‑make reduction that brings a burst of fruitiness, a hint of wine‑y sophistication, and a touch of honeyed sweetness that never feels cloying. Together they create a harmony that feels both rustic and restaurant‑worthy, perfect for a cozy family dinner or a special occasion where you want to impress without spending hours in the kitchen.
But wait—there’s a secret trick hidden in step four that will elevate the sauce from good to unforgettable, and I’ll reveal it later in the tutorial. Have you ever wondered why the skin on a duck breast sometimes stays soggy, even after a long sear? The answer lies in a small but mighty technique that I’ll walk you through, ensuring that every bite delivers that coveted crackle you’ve been craving. And if you’re thinking about pairing this with a side, stay tuned because I’ll share a quick, seasonal vegetable idea that complements the flavors perfectly.
Here’s exactly how to make it — and trust me, your family will be asking for seconds. Grab your skillet, fire up the stove, and let’s dive into a culinary adventure that will leave your taste buds dancing and your guests begging for the recipe.
🌟 Why This Recipe Works
- Flavor Depth: The combination of duck’s rich, gamey profile with the bright acidity of cherries creates a layered taste experience that feels both comforting and exciting. Each bite delivers a contrast that keeps the palate engaged from start to finish.
- Texture Contrast: The crispy skin provides a satisfying crunch, while the interior remains tender and moist, offering a delightful mouthfeel that’s hard to achieve with other poultry.
- Ease of Execution: Despite sounding gourmet, the recipe relies on straightforward techniques—searing, deglazing, and a quick cornstarch slurry—making it accessible even for home cooks who are still mastering the art of pan‑searing.
- Time Efficiency: From prep to plate, you’re looking at under an hour, which means you can serve a restaurant‑quality main course on a weeknight without sacrificing flavor.
- Versatility: The cherry sauce can be swapped for other fruit reductions—think plum, raspberry, or even a citrus‑infused orange glaze—allowing you to tailor the dish to the season or your personal preference.
- Nutrition Balance: Duck provides high‑quality protein and healthy fats, while cherries add antioxidants and a dose of natural sweetness, creating a balanced plate that satisfies both taste and nutritional goals.
- Ingredient Quality: Using fresh, skin‑on duck breasts and ripe cherries ensures that each component shines, and the simple seasoning lets the natural flavors speak for themselves.
- Crowd‑Pleasing Factor: The visual appeal of a glossy, ruby‑red sauce draped over a golden duck breast is enough to make anyone pause, and the flavor profile wins over even the most skeptical eaters.
🥗 Ingredients Breakdown
The Foundation: Duck Breasts & Basics
The star of this dish, the duck breasts, should be skin‑on and trimmed of excess fat. The skin acts as a natural barrier, protecting the meat while it renders its own fat, resulting in that coveted crackle. Look for breasts that are about 6‑8 ounces each, with a uniform thickness so they cook evenly. If you can, choose duck from a trusted butcher who sources locally raised birds; the fresher the meat, the more pronounced the flavor. For those who can’t find fresh duck, a high‑quality frozen duck breast, thawed slowly in the refrigerator, works just as well.
Aromatics & Spices: Building the Flavor Base
Seasoning the duck generously with salt and pepper is essential; it draws out moisture and enhances the natural taste. Fresh thyme adds an earthy, slightly floral note that pairs beautifully with both the duck and the cherries. Smashing two garlic cloves and tossing them into the pan while searing infuses the rendered fat with a subtle, aromatic depth that permeates the entire dish. If you’re feeling adventurous, a pinch of smoked paprika can introduce a whisper of smoky warmth without overwhelming the delicate balance.
The Secret Weapons: Cherry Sauce Essentials
The sauce’s backbone is a cup of fresh or frozen pitted cherries. Fresh cherries bring a bright, juicy burst, while frozen ones are a convenient year‑round alternative that still deliver that sweet‑tart punch. Red wine, preferably a Merlot or Pinot Noir, adds richness and a hint of tannic structure, turning the sauce into a sophisticated reduction. Balsamic vinegar contributes a mellow acidity and a touch of caramelized complexity, while honey or maple syrup balances the acidity with natural sweetness. A teaspoon of finely grated fresh ginger is optional but adds a zingy warmth that lifts the entire sauce.
Finishing Touches: Thickening & Seasoning
A simple slurry of cornstarch mixed with cold water is all you need to achieve a glossy, velvety texture without over‑cooking the cherries. Finally, a pinch of salt and freshly ground black pepper ties everything together, ensuring the sauce isn’t overly sweet or sour. Remember, the sauce should coat the back of a spoon—if it’s too thin, add a touch more slurry; if it’s too thick, a splash of extra wine or a dollop of broth will loosen it up.
With your ingredients prepped and ready, let's get cooking. Here's where the fun really begins...

🍳 Step-by-Step Instructions
Begin by patting the duck breasts completely dry with paper towels; this is the secret to a crackling skin. Once dry, score the skin in a crosshatch pattern, being careful not to cut into the meat. This not only helps the fat render evenly but also creates a larger surface area for the seasonings to cling to. Generously season both sides with salt and pepper, then let the breasts rest at room temperature for about 10 minutes while you preheat your skillet.
Place a heavy‑bottomed skillet—cast iron works best—over medium‑high heat and let it warm up for a minute. Add the duck breasts skin‑side down, no oil needed because the duck will release its own fat. As the skin contacts the hot pan, you’ll hear a satisfying sizzle, and within a few minutes the edges will begin to turn a deep golden brown. Reduce the heat to medium‑low and let the fat render slowly; this is where patience pays off, because a slow render yields a crisp, non‑greasy skin.
💡 Pro Tip: Tilt the pan occasionally and spoon out the rendered fat to keep the skin from frying in a pool of oil; you can reserve this fat for sautéing the sauce later.After about 8‑10 minutes, flip the duck breasts to the flesh side and sear for an additional 3‑4 minutes, just enough to develop a light caramel color. At this point, add the smashed garlic cloves and a few sprigs of fresh thyme directly into the pan, allowing their aromas to infuse the remaining fat. You’ll notice the kitchen filling with a fragrant, herb‑laden perfume that signals you’re on the right track.
Remove the duck breasts from the pan and set them on a cutting board to rest for at least 5 minutes; resting lets the juices redistribute, keeping the meat juicy. While the duck rests, increase the heat to medium‑high and pour in the red wine, scraping up any browned bits stuck to the pan—those are flavor gold. Let the wine reduce by half, which should take about 2‑3 minutes, concentrating its depth and creating a glossy base for the sauce.
Now, add the pitted cherries, balsamic vinegar, and honey (or maple syrup) to the pan. Stir gently and watch as the mixture bubbles, releasing a sweet‑tart aroma that makes your mouth water. If you’re using fresh cherries, you’ll notice them soften and release their juices quickly; frozen cherries will do the same once they thaw in the hot pan. Let the sauce simmer for about 5 minutes, allowing the flavors to meld and the cherries to break down slightly.
Here’s the thing: to achieve that perfect, velvety finish, you’ll need to thicken the sauce. Mix the cornstarch with cold water to form a smooth slurry, then pour it into the simmering sauce while whisking continuously. The sauce will thicken within a minute, turning a luscious, deep ruby color. Taste and adjust the seasoning with a pinch of salt and freshly ground black pepper; remember, the sauce should be balanced—not overly sweet or too acidic.
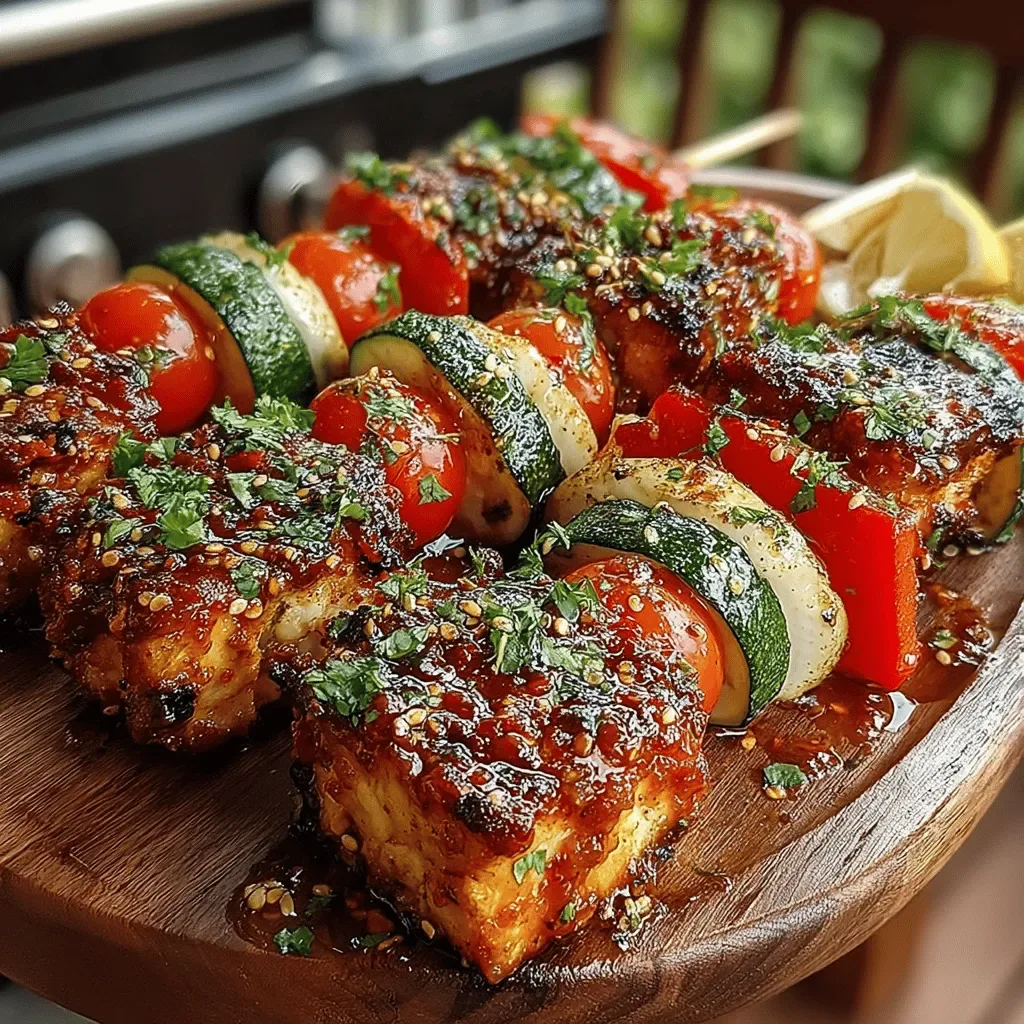
⚠️ Common Mistake: Adding the cornstarch slurry too early can cause the sauce to become gummy; always add it at the very end of the reduction.Slice the rested duck breasts on a diagonal, about a half‑inch thick, arranging the slices skin‑side up on a serving platter. This presentation showcases the crackling skin and lets the sauce pool beautifully around each slice. Drizzle the warm cherry sauce generously over the duck, allowing it to cascade over the edges and create a glossy sheen that looks as good as it tastes.
For an extra touch of elegance, garnish with a few fresh thyme sprigs and a scattering of whole cherries (pitted, of course). The bright red fruit against the golden skin creates a visual contrast that’s perfect for photo‑ops and adds a burst of fresh flavor with each bite. Serve immediately with your favorite side—roasted root vegetables, creamy polenta, or a simple mixed green salad tossed in a light vinaigrette.
And there you have it! But before you dig in, let me share some tips that will take this from great to absolutely unforgettable...
🔐 Expert Tips for Perfect Results
The Taste Test Trick
Before you finish the sauce, dip a spoon into the pan and let it cool for a few seconds. Then, taste a tiny drop—if it’s too sharp, a quick drizzle of honey will round it out; if it’s too sweet, a splash of extra red wine or a pinch of salt will bring balance back. Trust your palate; it’s the best gauge for final adjustments.
Why Resting Time Matters More Than You Think
Resting the duck isn’t just a courtesy; it’s a crucial step that prevents the juices from spilling out onto the plate. While the meat rests, the residual heat continues to cook the interior gently, bringing it to a perfect medium‑rare (or your preferred doneness). I once sliced the duck immediately after cooking and ended up with a dry, less flavorful piece—lesson learned!
The Seasoning Secret Pros Won’t Tell You
A pinch of flaky sea salt added just before serving can amplify the flavor of the skin, giving it an almost caramelized crunch. Professionals often finish with a light dusting of smoked salt for an extra layer of depth that’s subtle yet unmistakable.
Managing Rendered Fat
The fat rendered from the duck is liquid gold. Instead of discarding it, reserve a tablespoon to sauté the garlic and thyme, or even to drizzle over roasted vegetables. This not only adds flavor but also reduces waste, honoring the whole ingredient.
Temperature Control Is Key
If your stove runs hot, start the duck over medium heat rather than medium‑high to avoid burning the skin before the fat has a chance to render. Conversely, if you have a low‑output burner, give the skin a little extra time on medium‑high to achieve that coveted crackle.
The Final Finish: Acid Balance
A final splash of fresh lemon juice or a drizzle of aged balsamic right before serving can brighten the sauce, cutting through the richness of the duck and making each bite feel lighter. The acidity lifts the fruit notes, creating a harmonious finish.
🌈 Delicious Variations to Try
One of my favorite things about this recipe is how versatile it is. Here are some twists I've tried and loved:
Spicy Cherry‑Chipotle Fusion
Add a teaspoon of chipotle in adobo sauce to the cherry reduction for a smoky heat that pairs beautifully with the fruit’s sweetness. The result is a bold, slightly spicy glaze that awakens the palate.
Citrus‑Infused Orange Cherry Sauce
Swap half of the red wine for freshly squeezed orange juice and add a strip of orange zest. This brightens the sauce, giving it a sunny, winter‑friendly twist that works wonderfully with roasted winter vegetables.
Herb‑Laced Plum Reduction
Replace cherries with plums, and stir in a handful of fresh rosemary and a dash of star anise. The plum’s deeper sweetness and the aromatic herbs create a sophisticated, autumn‑ready sauce.
Maple‑Balsamic Glaze
Use pure maple syrup instead of honey and increase the balsamic vinegar slightly for a tangy‑sweet glaze that pairs perfectly with roasted sweet potatoes or a simple grain pilaf.
Asian‑Inspired Soy‑Ginger Cherry Sauce
Add a tablespoon of soy sauce, a splash of rice vinegar, and a pinch of toasted sesame oil to the cherry sauce. Finish with a sprinkle of toasted sesame seeds for an umami‑rich, slightly nutty flavor profile.
Berry Medley Mix
Combine cherries with raspberries and blackberries for a richer, more complex fruit sauce. The added berries bring a subtle tartness that balances the duck’s richness beautifully.
📦 Storage & Reheating Tips
Refrigerator Storage
Store any leftover duck and sauce in separate airtight containers in the fridge. The duck will keep for up to 3 days, and the sauce will stay vibrant for 4–5 days. When reheating, keep the sauce on low heat and stir frequently to prevent scorching.
Freezing Instructions
Both the cooked duck breasts and the cherry sauce freeze beautifully. Portion the duck into individual servings, wrap tightly in plastic wrap, then place in a freezer‑safe bag. The sauce can be frozen in a silicone muffin tray for easy portioning. They’ll retain quality for up to 2 months.
Reheating Methods
To reheat the duck without losing crispiness, start by gently warming the meat in a low oven (about 275°F/135°C) for 10‑12 minutes, then finish skin‑side down in a hot skillet for 2 minutes to revive the crackle. For the sauce, a quick microwave burst works, but a stovetop reheating with a splash of water or extra wine ensures a smooth, glossy texture.